The Redlamp Headlamp
Jeff's 1.1oz LED Headlamp
(C) 2001 by Jeff Deutsch
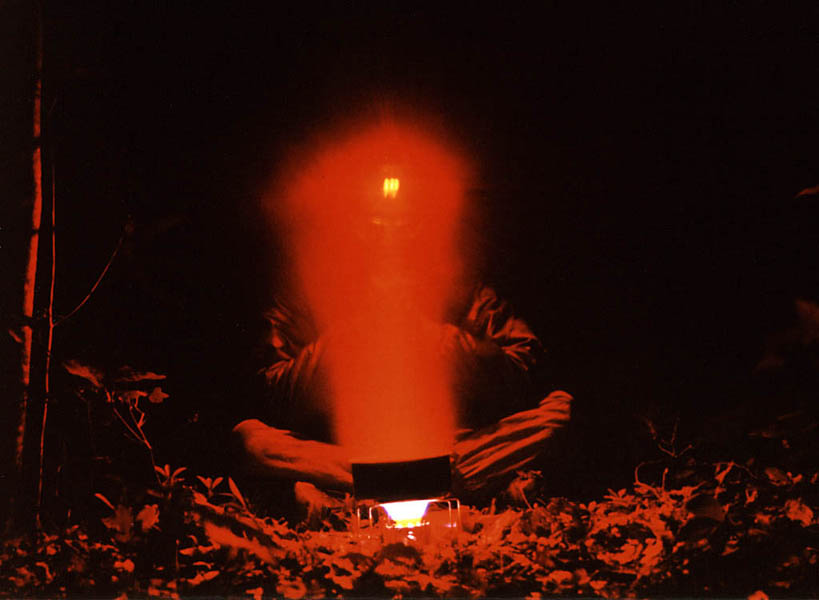
Steam from boiling water illuminated by the Redlamp Headlamp.
Shenandoah National Park, May 2001
(C)2001 by Jeff Deutsch -- Canon EOS, 50mm, f4.5, 30sec, ISO100
I wish I had a picture of the first LED headlamp I ever built. You would laugh. Everyone else did. It was simply a medium bright red LED mounted through the battery case of my Petzl Zoom. Had a switch, a separate battery and resistor. I'd use the Zoom when I needed lots of light, then spin it around and use the LED to conserve power when I needed less light. Early in 2000 the light was sufficient to read a book for several hours while waiting for some friends to arrive at the start of a three day canoe trip. That was before Petzl or Princeton Tec or Black Diamond sold their LED headlamps.
Since then I've built a few more LED headlamps. They get lighter, brighter and more robust with each generation. Now I've finally reached the point where I have a light that is sufficient for all my backcountry needs. Following the instructions in this document, you can make one of your own. You will likely find ways to improve the light -- I usually do. Let me know if you build one and love it or hate it or want to change it. Enjoy!
Jeff Deutsch
jkd4@cornell.edu
Why A Red LED Headlamp?
Monochromatic red light has one major advantage over white light and monochromatic lights of other colors -- it doesn't affect night vision (much). The LEDs used in my headlamp produce most of their light near the 626nm wavelength. This red light doesn't cause the pupils of the eye to constrict, and therefore night vision is maintained even when using the lamp. This is valuable on a moonlit night or when enjoying brilliant stars. It also means that the headlamp itself doesn't need to be as bright as a corresponding white headlamp.
LEDs use less power than incandescent bulbs (actually, many incandescent bulbs put out more lumens per watt than an LED, but if you want red light you have to filter all the other colors from an incandescent bulb and that makes them much less efficient). With a single lithium camera battery, this light will run for... for... for a long time. Ok, I haven't measured it yet. If anyone wants to build one and test the run time, I'd be glad to know the results. The best test would be to run it for about four hours a day. See when the light starts to fall off and when it is very dim. But that might take a few months, so a test where it is turned on and left on until dim would be useful too.
Red LEDs are particularly useful compared to white or blue LEDs. Significantly, they operate on about 2 volts, so a single 3 volt battery can power the headlamp. By contrast, white LEDs all require over 3 volts and therefore can't be powered by a 3 volt battery without extra circuitry to boost the voltage. The Petzl Tikka uses three AAA batteries to reach 4.5 volts. The three AAAs weigh more than a single lithium battery. In addition, the lithium battery has excellent cold weather performance and an excellent power to weight ratio relative to standard alkaline batteries (it is possible to find lithium AAA batteries, but they are rare and expensive).
In addition to using less power, LED bulbs are cool to the touch and rarely burn out. There is no filament to break as in a normal bulb. Since my headlamp uses three LEDs, even if one does break there are two others to produce light. And it can run zero, one, two or three LEDs at any time. One LED is sufficient for camp tasks like cooking and uses less energy than running all three LEDs.
This specific headlamp design has features important to me. First, it is very lightweight, weighing just over 1oz including the battery. It is also very compact. I tend to carry it in a pocket while backpacking. It is cheap and simple to build. Parts cost under $15 and with a bit of practice it can be constructed in two or three hours.
This headlamp design is fairly robust. Now it isn't going to hold up to abuse the way a commercial headlamp will. But it does survive quite well if treated carefully. It isn't waterproof in the conventional sense, but it works just fine in a wet environment. In fact, it will continue to run while completely submerged. The LEDs themselves aren't affected by water. In the worst case, water may short out the switch, so the light can't be turned off until it dries. And don't worry about getting shocked -- the whole system runs at 3 volts, not enough voltage to shock through skin. If you don't believe me, pick up a 3 volt battery and touch the + and - ends at the same time. Heck, try it with a 9 volt battery.
Why Not A Red LED Headlamp?
Nothing is perfect, is it? There are a few drawbacks to red LED headlamps in general and my design in particular. I'll list those drawbacks here, but you'll note that this section is much shorter than the previous section which drones on and on about the advantages of my headlamp.
The biggest disadvantage is that everything looks red. Takes some getting used to. This means that it is difficult to see some items which are naturally red. If you have a red tent or a red jacket -- no worries, it will still look normal. But if you are looking for red blazes on a tree or trying to find a red line on a map, then you have problems. The entire tree and the entire map look red, so it is hard to spot the naturally red object with a red background. My solution to this problem is to carry the yellow Photon II Microlight as my backup light (Photon claims this light will run 120 hours on its single lithium watch battery). Problem solved. Another solution would be to change the headlamp design to use a different color (like yellow) for the center LED. You would still have the two other LEDs to provide your red light.
Red does preserve your night vision. Works great until your hiking partner exclaims, "You call THAT a headlamp!? Now this... this is a headlamp!" Then proceeds to blind you with a some monster halogen headlamp running on a 4.5 volt battery that could power an LED headlamp for a decade (actually a good idea... I'm already working on a 4.5 volt LED light for my bicycle tail light). Yes, yes, your partner's big headlamp certainly is bright. Though it leaves him with no night vision, so it had better be bright. And nobody had better want to see anything outside that halogen beam. Don't bother looking at the stars either. The solution to this problem is to build two LED headlamps. The first one is where you learn how to use a soldering iron and make plenty of mistakes. This one you loan to your hiking partner. The second is perfect. You wear that one.
Drawbacks specific to my headlamp are that it is difficult to change the battery in the field (or at home for that matter). But the battery lasts a very long time, so hopefully this isn't too much of a problem (yet another reason to carry a backup light). Also, if you wear glasses you may notice some annoying glare on the top of the frames. See the construction instructions for some hints on minimizing this glare. This problem isn't specific to LED headlamps, but will occur with any small headlamp with a light source very close to the forehead. Actually, putting your light on your forehead is one of the worst places for it. I explain why (and provide some alternatives) in the instructions below.
LED basics
An LED (light emitting diode) is a semiconductor that allows voltage to pass in one direction (that's the "diode" part). When voltage passes through the diode, photons are given off (that's the "light emitting" part). Diodes have a specific polarity; that is, they have a + side and a - side. Usually, the + side is the longer of the two leads from the LED. Also, the - side usually has a little flat spot in the plastic housing (it is hard to see, look close). It is important to be able to find this flat spot because it is the only way to figure out which lead is which after you trim the leads. If you care, the + side is called the anode and the - side is called the cathode. Don't hook up an LED backwards.
LEDs have a few numbers associated with them. A brief summary:
A uniform brightness of one candela in a sphere (that is, in all directions) produces 4pi lumens of light (about 12.5 lumens). So a lumen is... Wait! Don't go away! Ok, you don't care about this stuff. I'll get back to building an LED headlamp now.
The Circuit
So we have a power source (a 3 volt battery) and an LED. We need one more thing to produce light. We need a resistor. The resistor is what keeps the current in the LED regulated to whatever value we choose. Otherwise the battery will try to pump as much current through the LED as possible. The result of connecting an LED to a battery without a resistor is that you need to buy a new LED. Try it if you want, but you will fry the LED in an instant. Yes, I know that mini-LED lights (like the Photon) don't use a resistor. That is because their weak little coin cell batteries have some internal resistance and the batteries themselves don't have enough power to fry an LED. But a large lithium camera battery, or even two AAA batteries, can easily fry an LED.
How do you pick a resistor value? Basic physics (you knew that would come in handy some day).
Voltage = Current x Reisistance V=IR
Remember that equation? Simple. You also need to remember that voltage is constant in a parallel circuit and current is constant in a series circuit. Am I going to loose you here? Then don't worry about that part. Just look at this sample calculation:
V = IR ==> V/I = R ==> (Vbattery - LED)/(ILED) = R
So if we (and by "we" I mean "you") have an LED with a forward voltage of 2 volts and a current of 20mA. What size resistor should we use to connect that LED to a 3 volt battery?
(3 - 2)/(0.020) = 50
The answer is 50 ohms (resistance is measured in ohms, usually represented by that funny horseshoe symbol: W). Remember that LED currents are usually measured in milliamps, but the calculation uses amps. That is why we change 20mA to 0.020 amps. Trivial? By the way, you can almost certainly get away with a resistor +/- 10% from whatever value you calculate (45 ohms to 55 ohms in this example).
What if you wanted to burn out your LED more quickly... umm... I mean get more light out of it. Try doubling the current to 40mA.
(3-2)/(0.040) = 25
Use a 25 ohm resistor. Cut the resistance in half and the current doubles. Easy, right? Almost makes you wish you could go back to high school and try to get better than a C in physics.
Yes, I do run my LEDs at twice their rated current. Supposedly, that will cause them to burn out faster and grow dim faster. But it does make them produce more light (not twice as much, but a noticeable amount more). You can do the same, or not. It is your choice. Just so you don't think I'm the only one torturing my LEDs, I measured my yellow Photon. It draws 50mA when I first turn it on. That drops to about 40mA pretty quickly (the resistance of the LED or the battery increases as it heats up). I assume that is about twice the rated capacity of the LED.
One more equation you need to know when designing LED lights:
Power = Voltage x Current ==> P=IV
We need this to know what capacity resistor to get. All resistors have a maximum power capacity. If you exceed that capacity then the resistor melts. In the example above, our 25 ohm resistor is dissipating 1 volt at 40mA (the voltage goes from 3 volts at the battery to 2 volts at the LED, so 1 volt is dissipated in the resistor). So we need a resistor that can handle at least 40 milliwatts (power is measured in watts).
Given all that, what does the circuit look like? Here it is in a standard circuit diagram. You don't need to understand this picture to build the headlamp, but I think it will help make sense of the construction.
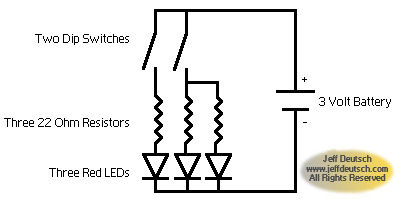
The forward voltage of the LEDs I use is slightly more than 2 volts (about 2.1 volts). So the 22 Ohm resistors send about 40 milliamps to each of the LEDs. Each resistor dissipates about 36 milliwatts (0.9V x 40mA = 36mw). Therefore a resistor that can handle 1/8watt (125mw) will be more than sufficient for this application.
Building The Light
Finally! The section you actually want to read. You don't care why I use an LED headlamp, and you don't want me to tell you how to design one (since I've already designed it for you). All you want is step-by-step instructions for building the headlamp. With pictures. Ok, here it is.
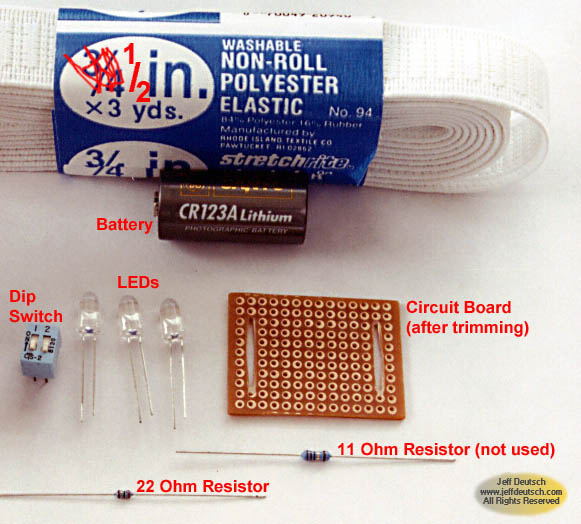
Step 1
Gather all the parts. I bought most of the parts from Hosfelt Electronics (www.hosfelt.com, 800-524-6464). Newark Electronics (www.newark.com) also carries similar supplies. I've included the Hosfelt part numbers where I had them handy.
The lamp:
|
3 |
626nm Red LED, 8000mcd (Hosfelt part #25-405)
Option: If you can find a better LED, use it. The photon LEDs are fantastic, but I don't know where you can buy them (short of buying three photon lights and taking the LEDs). Hosfelt sells several other red LEDs in the same mcd range(like 25-359). These are cheaper, but don't produce as deep a red color as the 25-405 LED. Let me know if you find a better source for LEDs than the ones I use. And remember, the red color does have some drawbacks. You might want to use two red LEDs and one yellow LED (the one on its own switch) so you have different color options (red, yellow, or red + yellow). You can't use an LED that requires more than 3 volts (like a white or blue LED) without changing other parts of the circuit. |
|
1 |
Dip switch (Hosfelt part #51-414)
Option: This dip switch has tiny little raised switches. I've never had it turn on accidentally. If that is a concern for you, try switch #51-408 which has recessed switches. Be warned, I find those almost impossible to manipulate. |
|
1 |
Circuit board (Hosfelt part #JALPC-1) |
|
1 |
3V Lithium Battery, size CR123A (www.cheapbatteries.com sells these much cheaper than anywhere else I've ever found them)
Option: You can shave a bit of weight off the headlamp by using the CR2 battery instead. It is a bit smaller and lighter. I'd guess that it has a shorter life too. |
|
30" |
24 AWG solid copper wire. This is solid (not the twisted strand stuff) copper wire that fits in the holes on the circuit board. Hosfelt sells it or you can scrounge some from just about any piece of broken electronics equipment. |
|
3 |
22 Ohm resistors, 1/8 Watt (Hosfelt sells them in batches of 200) |
|
12" |
Clear packing tape |
|
2" |
Electrical tape |
The Headband:
|
36" |
1/2" elastic (sold at many mass merchandisers such as WalMart or Target) |
|
1 |
1/2" triglide (I can't find the 1/2" size, so I use the 3/4" size which works reasonably well) |
|
1 |
needle and thread |
|
1 |
tube of clear silicone caulk (from any building supply store such as Home Depot) |
Tools:
|
12" |
Rosin core solder, not acid core |
|
1 |
Soldering iron, 25 to 40 Watts |
|
1 |
Part holder. I use the Hosfelt HH1 ($3.79) to make soldering easier. You don't really need one, especially if you can convince a friend to help hold the parts you are soldering with a burning hot iron... umm... better buy the part holder. |
|
1 |
Wire strippers. I actually like scissors just as much as any pair of wire strippers I've used. |
|
1 |
Needle nose pliers |
|
1 |
File |
|
1 |
Dremel (or similar) tool. Not essential, but useful for shaping the circuit board. |
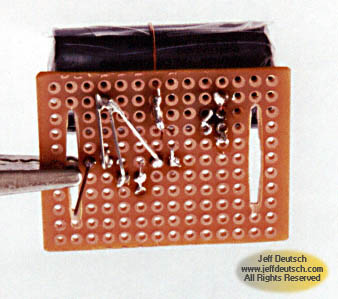
Step 2
Use a dremel tool or something similar to cut the circuit board as shown in the picture above. You are trimming the circuit board to be just the right size for the headlamp components, and adding two 1/2" slots for the headband. This step is not essential. You can build the headlamp using an unmodified circuit board. You will just have a slightly large headlamp and will have to improvise a method of attaching the headband (string through the large holes in the corners of the circuit board will do the trick).
Step 3
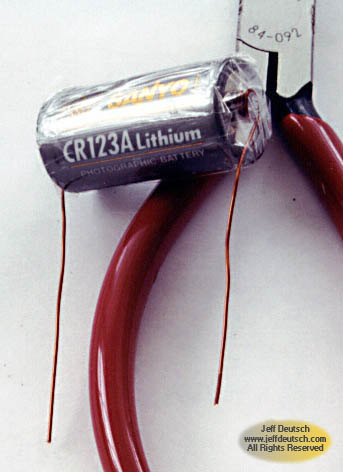
Cut a 3" length of the 24 gauge wire. Remove all insulation from the wire. Poke one end of the wire through the small holes in the + side of the battery and twist the wire so it stays in place.
Step 4
Cut a 4" length of the 24 gauge wire and remove all the insulation. Make a coil out of one end of the wire by wrapping it around the pliers (or some other tool).
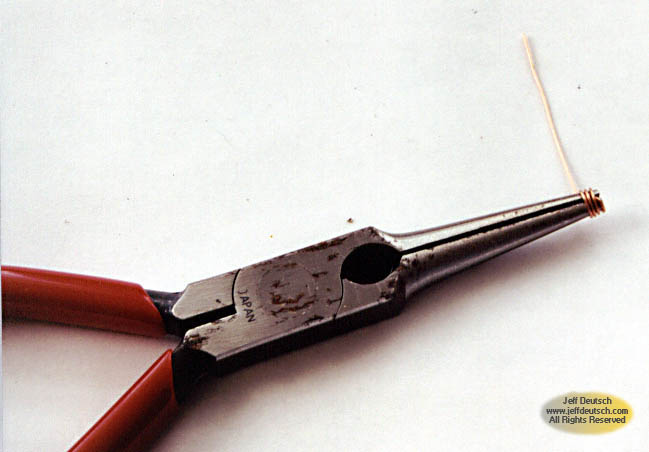
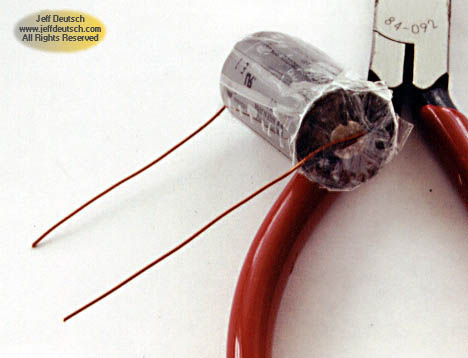
Step 5
Press the coil against the - side of the battery and wrap the whole battery in strips of clear packing tape. Wrap the battery tightly so that the wire stays in place.
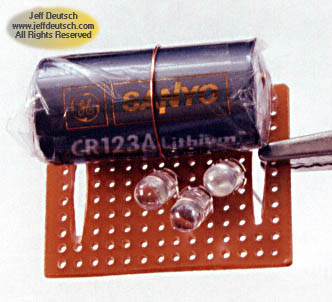
Step 6
Put the wires through holes at the top of the circuit board. Pull the wires tight and solder in place. In the picture in step 7, I've cut the excess wire. However, if you leave the excess wire in place, it may make wiring the headlamp easier.
Step 7
Cut a 3" length of the 24 gauge wire and remove all the insulation. Wrap the wire around the center of the battery and then through the circuit board. Using pliers, pull the wire tight and twist the two ends together on the back side of the circuit board. This wire doesn't carry current, it is simply to help hold the battery in place. Solder the twisted ends together to keep everything tight. Cut off the excess wire.
Note: To replace the battery, just remove all the clear plastic tape. Push the + and - contacts aside and slide the battery out from the wire around the middle. Slide the new battery in place, put the contacts back, and wrap in tape. Step 8
Solder the LEDs in place on the circuit board. Don't place them flush against the board. Leave about 1/4" of wire between the base of the LED and the top of the circuit board. This will allow the LEDs to be bent so they can be aimed correctly. Wiring will be easiest if you place the two outer LEDs so that their + leads are outside and their - leads are inside. The center LED can be placed in either orientation.
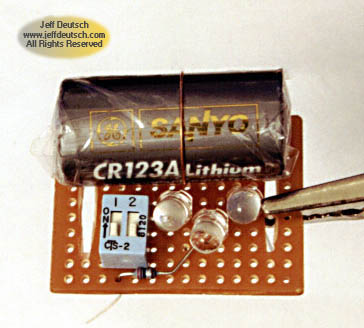
Step 9
Place the switch on the circuit board and solder in place. Make sure both switches are off so that you don't have current flowing to the circuit as you assemble it.
Step 10
Solder the + side of the battery to both top terminals on the switch. The switch doesn't have a polarity, but it is easiest to connect the battery to the terminals which are closest to the battery. These top terminals are now the input terminals on the switch, the terminals at the bottom of the switch are the output terminals. You may need a small bit of wire to do this, but you can probably do it by bending the excess wire from the + terminal of the battery (that is the wire you didn't trim) to the terminals. Now trim the wire so it just reaches the terminals. Solder to one terminal, then use wire or a solder bridge to join the two terminals together.
Step 11
Solder a 22 Ohm resistor to the output terminal on switch #1 (the two switches are numbered on the front) and to the + lead of the middle LED. Step 12
Solder the other two 22 Ohm resistors to the output terminal on switch #2. Each resistor then goes to the + lead on the remaining two LEDs. Make sure that none of the metal leads from the resistors touch each other. It is fine for the ceramic part of the resistors to touch each other or the metal leads. If you are careful routing all your wires then you shouldn't have any overlap. If you must overlap wires, put a piece of electrical tape between them so they don't short.
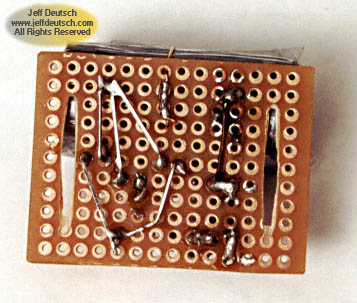
Note that in the picture, I used a single 11 Ohm resistor to the two LEDs. I don't recommend that you build the circuit that way. Each LED should have its own resistor. In theory, as the internal resistance of the LED changes (as it heats up) the two LEDs sharing a resistor could start passing a different amount of current. One gets too much current and the other too little. I've never had that problem, but why buy two hundred extra 11 Ohm resistors just to build a circuit that isn't as good. Step 13
Bend all three - leads from the LEDs to the - wire from the battery. Solder them all together. I had done this earlier in the process when I took this picture, so you won't see as many of the components.
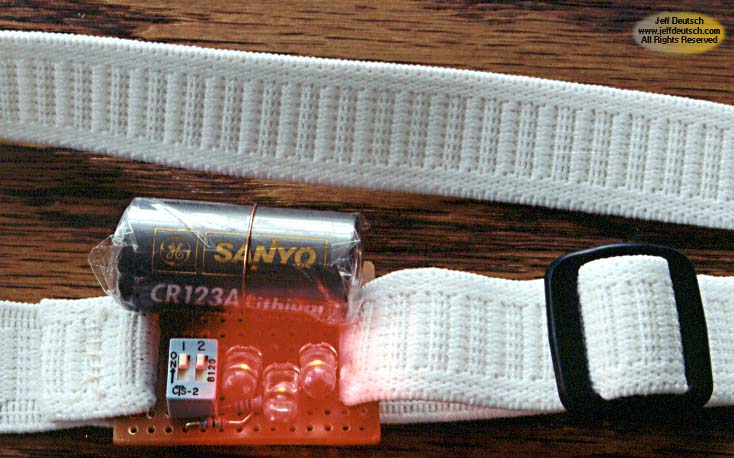
Step 14
Now you should have a working headlamp. Switch #1 turns on the center LED. Switch #2 turns on the two other LEDs. Test it and see if it works. Trim any excess wire.
Step 15
File all of the solder joints on the back of the circuit board. Make it as low profile as possible without damaging any of the connections. BE CAREFUL that you don't short the + side of the battery directly to the + side of the LEDs. If you short the battery directly to the LED without going through the resistor then you can fry the LED. Carefully file the + lead from the battery and the input terminals of the switch. Then cover them with electrical tape and file the rest of the circuit (with the switches off).
Step 16
Add a headband to the lamp. Cut a length of elastic long enough to go around your head with a bit left over. Put one end through the slot and sew it to itself. Put the triglide on the other end, pass it through the other slot, then back through the triglide.
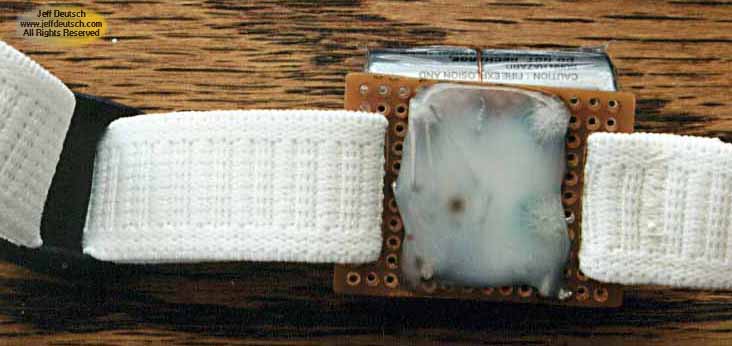
Note: Consider sizing the band to go around something other than your head. A problem with all headlamps (LED and incandescent) is that the light source is right next to your eyes. As a result, you can't see shadows. If a large rock or tree branch is sticking up out of the path, then you won't see the shadow and you are much less likely to notice that it is sticking up significantly. The further the light is from your eyes, the more of the shadow you will see and the better perspective you have. Put the lamp around your wrist when night hiking -- no more stubbed toes and stumbles. For activities when you need your hands (like cooking or setting up a tent) it may be best to have the lamp back on your forehead. Step 17
Cover the back of the circuit board with a thin layer of the silicone caulk. This will keep sharp prongs of solder from puncturing your flesh. Wait for the caulk to dry, then add additional layers for comfort as desired. You may also want to add some caulk to the front, just under the LEDs. For people with glasses, this will help reduce glare on your glasses. In any case, the caulk on the front will help protect the LEDs from being mashed and bent in your pack. Bend the LEDs into a position so that they cast light where you want it. Then add caulk until the LEDs stay in place. Note that enough bending will break the LEDs at the leads. So try to get them into a position where you want to keep them. Then add caulk to keep them from being bent towards the circuit board.
That is it! Enjoy your headlamp. I would really appreciate hearing from you if you build one.